Lock Shop Direct measurement guide
How to Identify and Measure a Multipoint Door Lock
Follow these steps to identify a multipoint lock fitted to a uPVC, composite, timber or aluminium door and record the measurements needed for an exact or repair replacement.
Important: Do not order from the brand or backset alone. The operating type, PZ centres, gearbox, faceplate and positions of every locking point must be checked.
1. Identify the locking operation and manufacturer
Start with the door open. Operate the lock and note how the hooks, rollers or bolts move. Common arrangements include lift-lever locks, key-wind locks, automatic locks and electronic or motorised systems.
Look for a name, logo or product code stamped on the faceplate and central gearbox. Photograph every marking. A known manufacturer and model is often the quickest route to an exact replacement.
2. Measure the centre gearbox
The two most important measurements are normally the backset and PZ centres, but also record the gearbox case dimensions and spindle arrangement.
| What to check |
How to measure or identify it |
Record |
| Backset |
Front of faceplate to the centre of the handle spindle or cylinder centre line. |
_____ mm |
| PZ centres |
Centre of handle spindle to centre of euro cylinder. |
_____ mm |
| Gearbox height |
Top to bottom of the central lock case. |
_____ mm |
| Gearbox depth |
Faceplate to rear of the central lock case. |
_____ mm |
| Spindle |
Square size, single or split spindle, and number of followers. |
________ |
| Latch/deadbolt |
Record layout, dimensions and whether the latch reverses. |
________ |
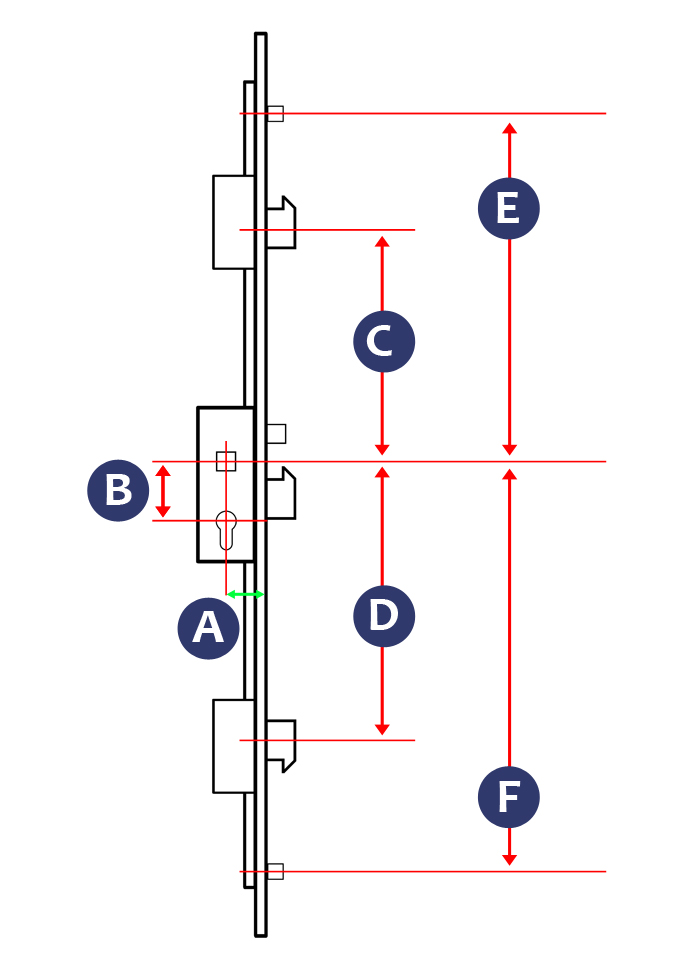 A is the backset; B is the PZ centres; C to F record locking-point positions from the spindle reference line.
3. Identify and measure every locking point
List the locking points from top to bottom. They may include hooks, rollers, mushroom cams, deadbolts, shootbolts or a combination.
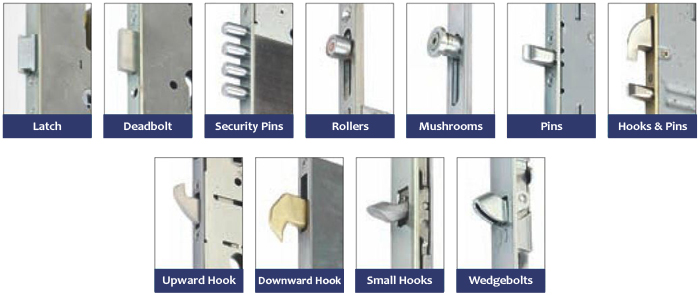 Identify the type, order and number of each locking point.
- Use the centre of the handle spindle as the reference point.
- Measure vertically from the spindle centre to the centre of each upper and lower locking point.
- Record whether each measurement is above or below the spindle.
- For adjustable rollers, also note the shape and diameter.
Do not measure only between the locking points. Product drawings usually reference them from the spindle or another stated datum.
4. Measure the faceplate and overall strip
- Overall strip length.
- Faceplate width.
- Flat faceplate or U-rail profile.
- Square or rounded ends.
- Top and bottom extensions beyond the furthest locking points.
- Fixing-hole and keep arrangement where relevant.
If the lock is too long but intended to be cropped, follow the manufacturer’s marked cutting limits. Do not cut through a drive bar, gearbox or locking point.
5. Final checks before choosing a replacement
Handles and cylinder
Confirm PZ, spindle system, door thickness, cylinder size and handle screw positions.
Keeps
An exact lock may reuse the existing keeps; a repair lock may require replacement or repositioning.
Door material
Record uPVC, composite, timber or aluminium, plus faceplate channel size.
Operation
Lift lever, key wind, automatic, split spindle and electronic functions are not interchangeable.
Handing
Check latch handing and whether the latch can be reversed.
Repair option
A multi-fit repair lock can be useful, but confirm its keeps, extensions and certification are suitable.
Keep the door open while testing: After fitting, operate and test the lock repeatedly with the door open before closing it into the frame.
Still not sure which product you need?
Send our team clear photographs and your measurements before ordering. Please include:
- A full-length photograph of the faceplate and every locking point.
- Close-ups of the central gearbox and all stamps or codes.
- Backset, PZ centres, gearbox and faceplate dimensions.
- Distances from the spindle centre to every locking point.
- Door material, handle type, spindle arrangement and operating method.
This guide is intended to help identify and measure replacement hardware. Product designs, terminology and handing conventions can vary by manufacturer. Always compare the complete product specification and fitting instructions. Where a door or fitting forms part of a fire escape, fire door, powered system or other safety-critical installation, obtain advice from a competent person before ordering or altering the hardware.