Lock Shop Direct measurement guide
How to Measure Window Espags and Handles
Use this guide to identify and measure replacement window espags, gearboxes and handles for uPVC, timber and aluminium windows.
Important: A handle and espag must be checked separately. Record the espag backset and strip details, then measure the handle fixing centres, spindle and any cockspur step height.
1. Measure the window espag
An espagnolette or espag is the metal locking strip fitted into the edge of many uPVC, timber and aluminium window sashes.
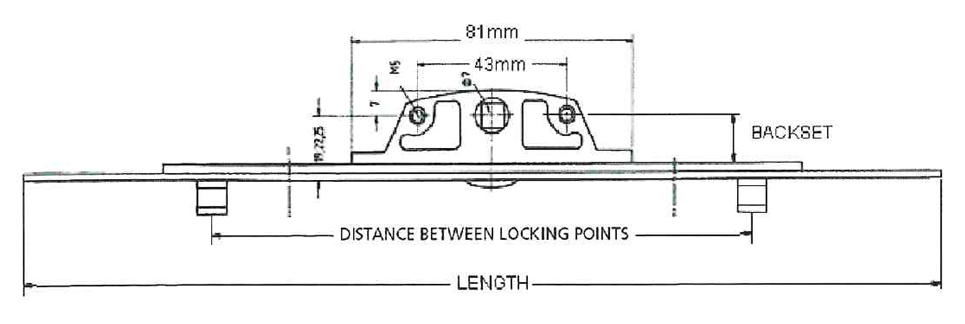 Measure the backset, overall strip length and faceplate width.
| What to check |
How to measure or identify it |
Record |
| Backset |
Front of faceplate to centre of the square spindle follower. |
_____ mm |
| Overall length |
End to end of the metal espag strip. |
_____ mm |
| Faceplate width |
Across the metal strip. |
_____ mm |
| Faceplate shape |
Flat, rounded, stepped or another profile. |
________ |
| Spindle follower |
Square follower size and position. |
_____ mm |
2. Identify the gearbox and locking points
Check whether the gearbox is inline or offset and record the number, type and position of the locking points.
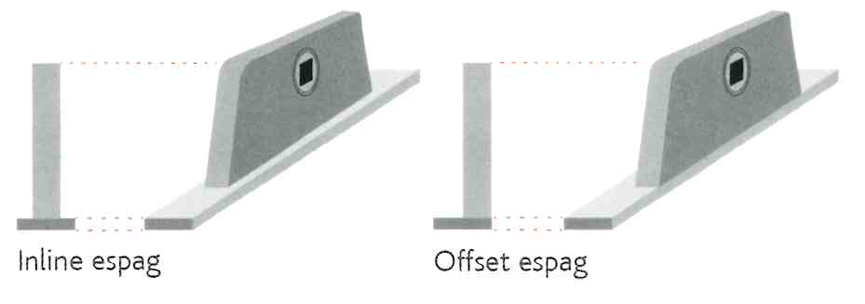 The spindle follower may sit in line with the strip or offset to one side.
- Inline or offset gearbox.
- Mushroom, roller, shootbolt or other locking points.
- Distance from the spindle centre to each locking point.
- Direction of operation and any handed components.
- Manufacturer, code and stamp on the strip or gearbox.
3. Identify the window handle type
Common types include espag handles, cockspur handles, tilt-and-turn handles, cranked handles and inline handles. Do not assume a similar-looking handle has the same spindle or fixing centres.
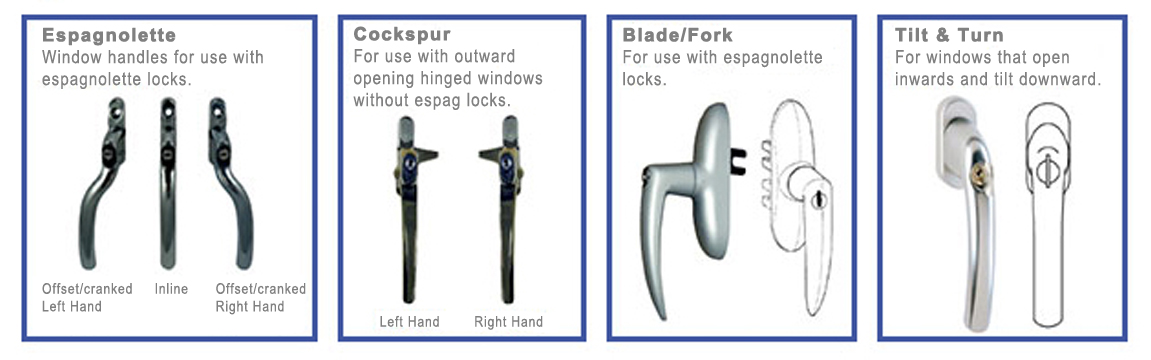 Identify whether the handle is inline, cranked, cockspur, tilt-and-turn or another type.
4. Measure the window handle
Remove the screw cover and measure from the centre of each fixing hole. Measure spindle length from the back face of the handle plate to the end of the square spindle.
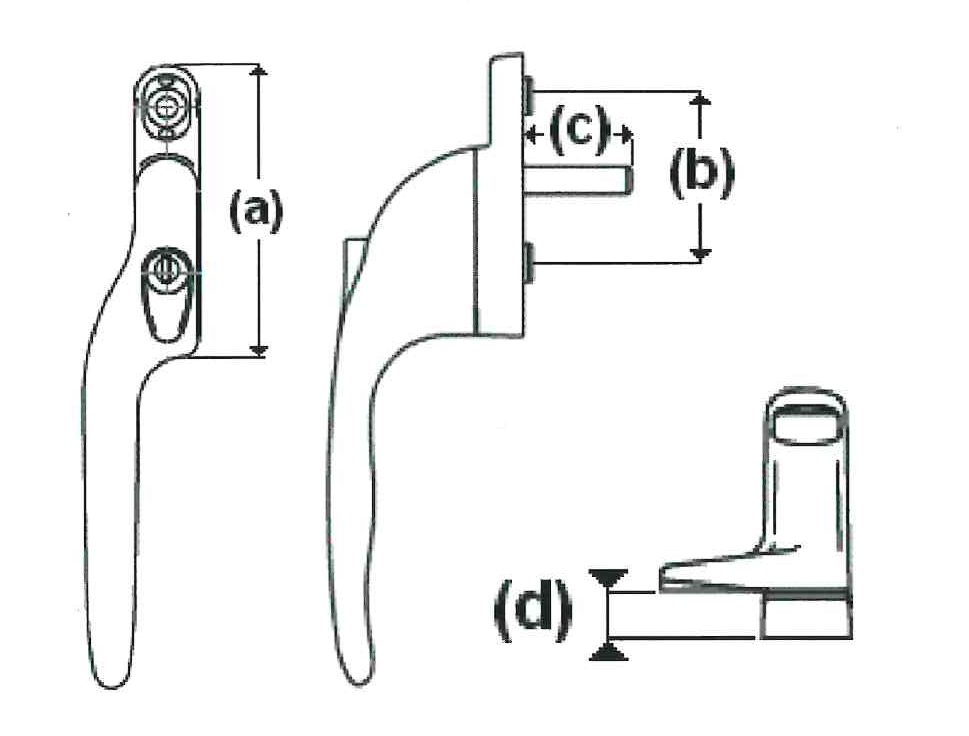 Record backplate size, screw centres, spindle length and cockspur step height where relevant.
| What to check |
How to measure or identify it |
Record |
| Screw centres |
Centre-to-centre spacing between fixing screws. |
_____ mm |
| Spindle length |
Back of the handle plate to end of spindle. |
_____ mm |
| Backplate |
Length, width and shape. |
_____ × _____ mm |
| Handle offset |
Inline or cranked; for cranked handles identify left or right. |
________ |
| Cockspur step height |
Back of handle base to underside of spur or nose. |
_____ mm |
| Wedge/keep |
Height, width and fixing arrangement of the matching wedge. |
________ |
5. Final safety and fitting checks
- Check whether the window is an emergency egress window and preserve the required opening function.
- Do not remove or bypass a child restrictor without considering its purpose and the building’s safety requirements.
- Check that the spindle is not so long that it bottoms out and prevents the handle seating properly.
- Test the mechanism with the window open before closing it into the frame.
Stiff operation may not be a handle fault: A misaligned sash, damaged gearbox or tight keeps can overload a new handle. Investigate the mechanism rather than forcing it.
Still not sure which product you need?
Send our team clear photographs and your measurements before ordering. Please include:
- A full photograph of the window edge with the sash open.
- Close-ups of the gearbox and any stamps or codes.
- Espag backset, overall length and faceplate width.
- Handle screw centres, spindle length and backplate size.
- Inline, cranked or cockspur type and any step height or wedge.
This guide is intended to help identify and measure replacement hardware. Product designs, terminology and handing conventions can vary by manufacturer. Always compare the complete product specification and fitting instructions. Where a door or fitting forms part of a fire escape, fire door, powered system or other safety-critical installation, obtain advice from a competent person before ordering or altering the hardware.